3.10. Adding a Cluster Service to the Cluster
To add a cluster service to the cluster, follow these steps:
At the left frame, click Services.
At the bottom of the right frame (labeled Properties), click the Create a Service button. Clicking Create a Service causes the Add a Service dialog box to be displayed.
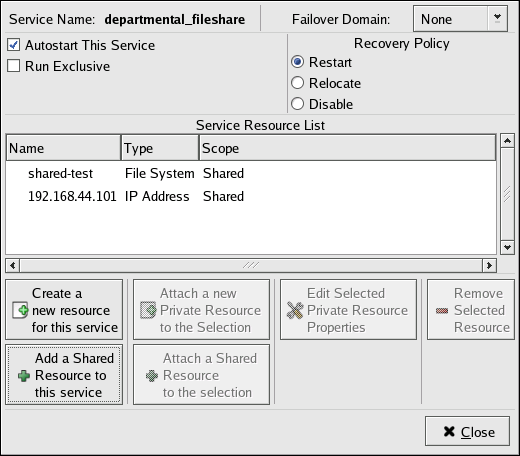
At the Add a Service dialog box, type the name of the service in the Name text box and click OK. Clicking OK causes the Service Management dialog box to be displayed (refer to Figure 3-12).

Tip Use a descriptive name that clearly distinguishes the service from other services in the cluster.
If you want to restrict the members on which this cluster service is able to run, choose a failover domain from the Failover Domain drop-down box. (Refer to Section 3.8 Configuring a Failover Domain for instructions on how to configure a failover domain.)
Autostart This Service checkbox — This is checked by default. If Autostart This Service is checked, the service is started automatically when a cluster is started and running. If Autostart This Service is not checked, the service must be started manually any time the cluster comes up from stopped state.
Run Exclusive checkbox — This sets a policy wherein the service only runs on nodes that have no other services running on them. For example, for a very busy web server that is clustered for high availability, it would would be advisable to keep that service on a node alone with no other services competing for his resources — that is, Run Exclusive checked. On the other hand, services that consume few resources (like NFS and Samba), can run together on the same node without little concern over contention for resources. For those types of services you can leave the Run Exclusive unchecked.
Select a recovery policy to specify how the resource manager should recover from a service failure. At the upper right of the Service Management dialog box, there are three Recovery Policy options available:
Restart — Restart the service in the node the service is currently located. The default setting is Restart. If the service cannot be restarted in the the current node, the service is relocated.
Relocate — Relocate the service before restarting. Do not restart the node where the service is currently located.
Disable — Do not restart the service at all.
Click the Add a Shared Resource to this service button and choose the a resource listed that you have configured in Section 3.9 Adding Cluster Resources.

Note If you are adding a Samba-service resource, connect a Samba-service resource directly to the service, not to a resource within a service. That is, at the Service Management dialog box, use either Create a new resource for this service or Add a Shared Resource to this service; do not use Attach a new Private Resource to the Selection or Attach a Shared Resource to the selection.
If needed, you may also create a private resource that you can create that becomes a subordinate resource by clicking on the Attach a new Private Resource to the Selection button. The process is the same as creating a shared resource described in Section 3.9 Adding Cluster Resources. The private resource will appear as a child to the shared resource to which you associated with the shared resource. Click the triangle icon next to the shared resource to display any private resources associated.
When finished, click OK.
Choose File => Save to save the changes to the cluster configuration.
| Note | |
|---|---|---|
To verify the existence of the IP service resource used in a cluster service, you must use the /sbin/ip addr list command on a cluster node. The following output shows the /sbin/ip addr list command executed on a node running a cluster service:
|